🏡 Elevate your outdoor storage game—secure, spacious, and built to last!
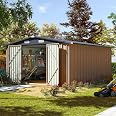
The Aoxun 9'6"x11'9" Outdoor Storage Shed is a robust galvanized steel utility shed designed for versatile outdoor use. Featuring a waterproof sloping roof, pad-lockable doors, and ventilation vents, it offers 560 cubic feet of secure storage space ideal for garden tools, bikes, and more. Engineered to withstand winds up to 30 mph and snow loads up to 6 inches, this modern brown metal shed combines durability with smart design, making it a must-have for organized, weather-resistant outdoor storage.


| Item Dimensions D x W x H | 120.08"D x 142.91"W x 76.38"H |
| Item Weight | 245.82 Pounds |
| Style | Modern |
| Color | Brown |
| Top Material Type | Metal |
| Material Type | Metal |
| Is Assembly Required | Yes |
T**D
Build it right its a "5"
Everything was fine did take a while to build but everything was fine. Some people say the holes don't line up it's because you have to pay attention to the holes when you're building it some times you have to pull on the flex of the metal make sure your holes are in the middle you'll be fine. My building does not leak a drop,trust me it rained a lot week after built,but I also added clear silicone to the Middle Screw on the roof, on the edges and in the middle of the wall screws.just to make sure.
J**E
Terrible instructions, good product
TLDR: The instructions can be better, and the product itself is decent/good if you have the patience and a second pair of hands to help you.###To start off, I bought this to use as a temporary storage for the mower and tools as our old 8'x10' shed is decomposing due to a leaky roof/broken side pane that the original owners did not fix/keep it in good shape in our backyard. For that purpose I figured a 4'x6' should be sufficient if a bit tight and I can always use this to house other things such as our extra trash cans, etc. on our property without having to go to the end of the driveway. For all of this, I think it's great. For a longer term solution for a large-ish shed, I am unsure if it would hold up over time. I am probably going to seal it up using spray foam around the bottom as there will definitely be a gap after building and will probably allow some water in during hard rainfalls. With all that out of the way, let's talk about the details you may want to keep in mind if you wanted to purchase / build this for your needs. I read some reviews and no one mentioned the instructions or help in assembling this so, here it goes.The build instructions are unclear on many things here, so here are some tips after going through the rigor of building this thing while cursing a lot and fighting mosquitos.General tips:1. Have plenty of space, if you can, to lay the pieces out.2. Have good light.3. Have a method to organize and not lose the screws and small pieces.4. DRY FIT/ASSEMBLE the pieces so you understand the way these pieces need to fit correctly, a few steps ahead of where you are, if you can.5. Remember that the sides/ends with the LARGE HOLES go over the piece/ends with the SMALL HOLES.6. Have someone help you hold/piece things together.7. Use a power driver or drill. I don't think you want to screw these many screws by hand.8. Don't forget to DRY FIT a few steps ahead!Base tips:1. The extruded side GOES UP, as the panels will need to screw into the sides of the extrusion.2. Corner braces should be facing UP (like a U) so you can screw in the sides without having to flip the base over.Side panels:1. Make sure you have the corner panels in correctly -- short side is on the long side of the base.2. You do not need to screw in the ends of either side as you will need to overlap and screw those in later.3. Speaking of -- make sure your overlaps are correct by DRY FITTING.4. Don't forget the door braces after you attach the top braces. Easy to overlook this when you are installing the side panels.Top braces:1. All pieces need to FACE DOWN (reverse U). Make sure you overlap LARGE HOLE side OVER the SMALL HOLE piece.Roof brace/support:1. The pieces are relatively flimsy so please be careful you don't bend snap these until they are completely together.Roof panels:1. CHECK AND MAKE SURE YOU HAVE THE L/R sides correct, with the correct overlaps.2. CHECK AND MAKE SURE YOU HAVE THE EDGE PIECES CORRECT -- these have the necessary holes for the trim and should be over the top brace by about 3-4" (I didn't measure exactly and am going by memory here).Doors:1. DRY FIT and brace the pieces by screwing in some then tightening after making sure it's correct for the L/R. Remember that the LARGE HOLE ends always go OVER the SMALL HOLE end/piece.2. The lock needs to be disassembled to attach correctly, meaning you need to take the large nut off, then screw the lock in with the nut on the inside of the door panel.Hope this helps someone!
D**
Well-Built, Reliable Shed — Great for Any Yard!
This shed has been a great addition to our backyard. It’s very functional, with enough space for all our tools, lawn equipment, and even a couple of storage bins. Everything stays dry—no leakage at all, even after a few heavy storms.The material thickness feels sturdy and durable, definitely built to last. It’s held up well against strong winds with no shifting or damage, which really speaks to its wind resistance.I also appreciate the built-in latch system—lockability is simple and secure with a standard padlock. All the holes were pre-drilled accurately, which made assembly smooth and straightforward.Highly recommend if you’re looking for a dependable shed that looks good and performs well!
N**G
Update #3:No floor, TONS of TINY screws! Falling apart
Update#3– the picture says it all. Since my last update the shed is literally popping pieces off overnight. Previously the seller wouldn’t make good on their offer of a full refund, but thought it satisfactory to offer $20 instead just makes this worse. Just don’t do it. Don’t buy this product or buy from this seller.For what it is, it’s fine. It doesn’t look cheesy or excessively cheap. It’s thin and not super sturdy. However, I’m currently in a rental and just needed something to make do. You will cut yourself if you’re not careful. Use the gloves included. The door flies open in the wind so I would recommend adding a latch from your local hardware store. It’s super easy to move around though. I’m not a large woman and was able to do everything myself. I also replaced the shorter screws on the corners with longer ones. The ones provided didn’t exactly tighten…there is not one panel & some framing pieces that don’t have a screw so loose I cannot unscrew it by hand.Also, because there are so many tiny screws, my fingertips were sore by the time I was done.Seller contacted me and offered new parts but I would have literally been sent a whole new shed because there isn’t one panel that doesn’t have at least one or two screws that weren’t completely able to be tightened. Offer of refund was made but seller recanted.Fine for now, but wouldn’t buy again or recommend this seller after the experience received.
Trustpilot
4 days ago
2 weeks ago