📸 Turn nostalgia into digital gold—scan, save, and share your story effortlessly!
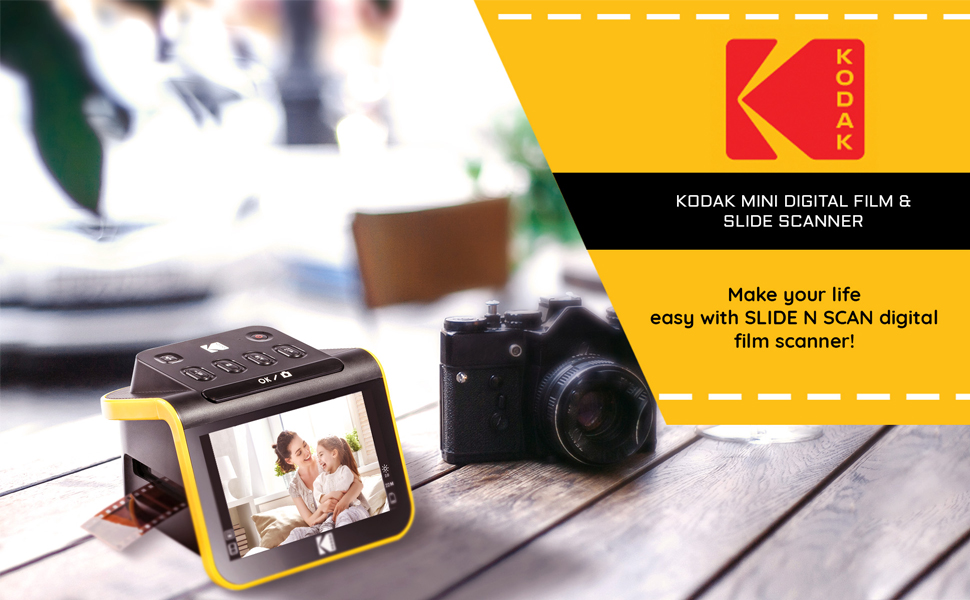
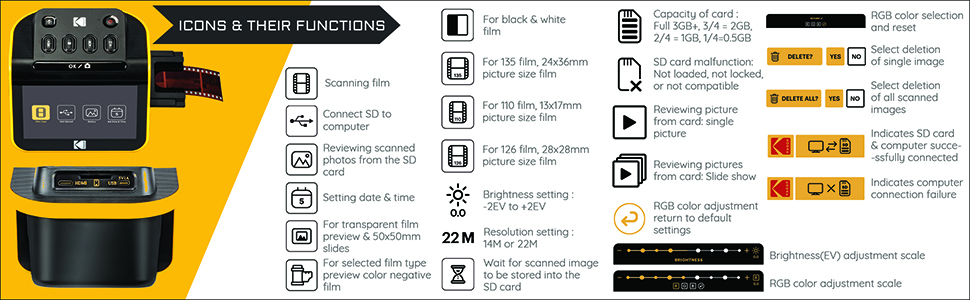
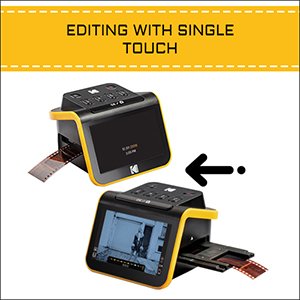
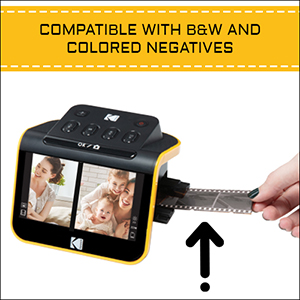
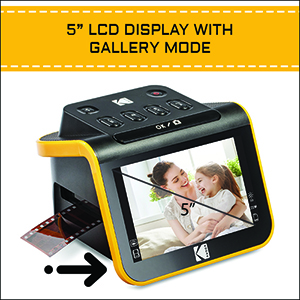
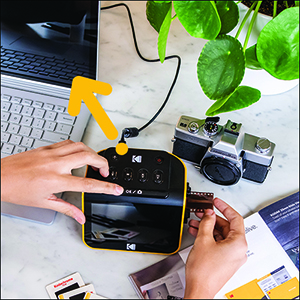
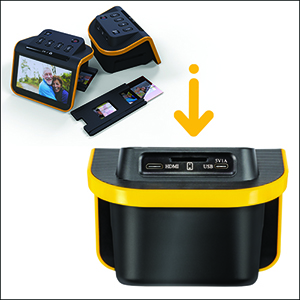
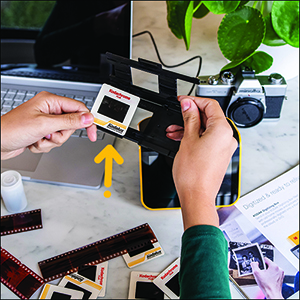
The KODAK Slide N SCAN is a compact, 22MP film and slide scanner featuring a 5-inch LCD for instant preview and editing. It supports multiple film formats (135, 126, 110) and uses quick-feed trays for continuous scanning. Compatible with SD cards up to 32GB and USB-C/HDMI connections, it offers one-touch editing and a stylish design perfect for modern professionals preserving their photo archives.
Item Weight | 1 Pounds |
Item Dimensions D x W x H | 5.27"D x 5.35"W x 3.74"H |
Minimum System Requirements | Windows 7 |
Standard Sheet Capacity | 1 |
Paper Size | 126 millimeter |
Optical Sensor Technology | CMOS |
Connection Type | USB, HDMI |
Resolution | 22 Megapixels |
Supported Media Type | Negatives, Slide |
Scanner Type | Film |
A**C
Perfect for family photos, good quality and fun to use
I'm so happy with this little device! As soon as it arrived I tested a 35mm color negative. It's really simple to use, as soon as you set up the scanner and slide in the negative, you can see the image immediately on the screen. It's so enjoyable and quick and the quality exceeded my expectations. You do need to buy a 32GB SD card or 32GB SDHC card. It will not work with larger GB or with SDXC cards.Setup:Plug in the USB-C/USB cable (provided) into the scanner. USB-C side goes into the scanner, and the USB side goes into to your PC or to a wall adapter. Insert the SD card in the back of the scanner (right next to the USB-C slot). Open the hinged slide holder and insert the adapter for 135mm, 126mm or 110mm depending on what film you are using, and then snap it closed again. The manual shows you how to align the adapter inside the hinged holder. If you are scanning slides you won't need an adapter, you will just need the slide holder. Insert the slide holder into the slot on the right side of the scanner. The arrow on the slide holder should be pointing toward the scanner. About an inch will still be visible, sticking out of the slot. This is where you insert the film.How to use:Press the power button (it must be plugged in to PC or wall using the USB cable to power on). Press the large OK button on the front to select film type. Use right/left arrows on the top of the machine to select film type and then click OK. Select the film size and click OK. Make sure your film is right side up, and slide the negative into the slide holder on the right side of the scanner. Smile when you see your image on the screen! You will need to adjust the film so that the image is centered on the scanner, and then press the large OK button again. Slide the film further in until you can see the next image. Press OK to scan. Once you can't push the film in any further, you can insert the next piece of film and it will push the first one through and out the left side. I found a few times where the film was curved and wouldn't go in past the first image. If this happens you can remove the slide holder from the scanner, insert the film into the holder while gently pressing down on the first image. It should slide through and you can reinsert the holder into the scanner with film already in it. It takes about 2 seconds for the image to scan.Transferring photos to your PC. You have 2 options - you can remove the SD card and insert it directly into your laptop/PC if it has a slot. If not you can connect the scanner to your PC using the USB cable (provided) while the SD card is still in the scanner. This will bring up a USB device on your PC and you can see all of the images. They are given file names based on the order you scan them. I have scanned over 1,000 images on the SD card so far.Quality: The quality of the images is better than I expected. For sure up to 8x10 prints would be high quality, I'm attaching a scanned image so you can see. Also please note in the scanned image I didn't center the negative properly. If you are moving too quickly through the images this can happen, so it's good to view the images periodically in case you need to rescan anything. Make sure you keep the film dust free, and also make sure the scanner is dust free. It comes with a cleaning brush that can be inserted into the slot where the slide holder goes to clean out dust. Do this with the soft part of the brush facing down. I didn't do this at first and some of the images ended up with some marks from the dust.
L**E
A good, easy to use basic scanner
It works well - as advertised. I really like the idea of only needing USB voltage to operate it until you decide to transfer the images. Then, of course, the USB cable needs to be from a computer. Then the scanner looks like just another USB drive.Beyond that, the scanner is limited in post scan operations - some brightness and color but these are limited. Along with that it can’t adjust focus, it can’t order or index the scanned and stored images. In addition, if you want to change image names they must first be copied to another drive. If you edit names in the scanner the images will still be there but they will not display.All in all, it’s easy to use, no setup is needed and it’s a small independent device with a nice viewing screen. For quality results it’s best to also have a photo app handy on your computer.
L**N
Decent for the price
Does an OK job of scanning slides. It's quick and easy which is a plus. The quality is good enough for posting on the web or small prints. Color is a bit off but only really noticable when compared directly with the original. If you are needing to make reference scans for a large catalog of slides/negatives then this does the job. if you want to make large prints then a flatbed scanner is a better bet.
S**I
Works exactly as advertised!
I have tons of old negatives from when I was a child. In many cases, I no longer have the photographs, so I love this product because I've been able to create digital photos from all my old negatives. This product is very easy to use. I attached a monitor so I can see the pictures better than the small screen on the device. I have negatives in 110, 126, and 35mm. I had no problem determining the correct film adapter to use (the size is marked on it) then lifting the cover on the hinged slide holder and inserting the film adapter, closing it and inserting it into the device. Then, it's very simple to slide your negative into the slot and position it on the screen, then hit the 'OK/Scan' button to capture the picture on the SD Card (I'm using a 32 GB card and it holds tons of pictures). You need to be sure you select the correct size image, etc. on the screen options too, but it's easy and user friendly.I had been keeping my negatives in my safe, but they take up a lot of space, so this allows me to keep the digital picture and get rid of all the negatives.I love it! Would definitely recommend if you want to keep the pictures, but get rid of the old negatives! It's a very compact device, so it doesn't take up much space either!
L**.
Made my transfer project easier
This is a very nicely made little unit to convert my slides and negatives to digital format. It is very easy to use, and I like that you can make adjustments on the color of the image . The only thing is that it took a moment and then I realized that you have to scan it and save the image on an SD card in the unit. Then you can transfer the contents of the SD card to your PC. So it is a 2 step process, and it will not scan and save directly onto your PC. It has to save on a SD card. Note that the SD card is not included, and the max size of the SD card is 32 gb. So I went out and purchased an inexpensive SD card for under $10. That worked great. So a suggestion when you purchase this, is to also buy an SD card that is no larger than 32 gb. I have a lot of old slides and negatives to go through, and this unit has made my life much easier. This is a good buy.
Trustpilot
1 week ago
1 month ago